
Ticket Panel Configuration
Complete guide to creating and configuring ticket panels in your Discord server.
Prerequisites
Before proceeding, please ensure the following:
- You have
Manage Serverpermissions or higher. - You have invited and configured the Basic Settings from the beginning of this whole guide.
- You have knowledge of managing and configuring a Discord server's permissions and settings.
Ticket panels allow users to create private support channels or threads in your Discord server. Each panel owns the tickets it creates: where they land, which roles handle them, what the opening message says, which questions are asked, who may close, and where the logs go. This guide covers both the quick setup wizard for easy panel creation and the comprehensive manual configuration options available in the panel editor.
Your Ticket Panels
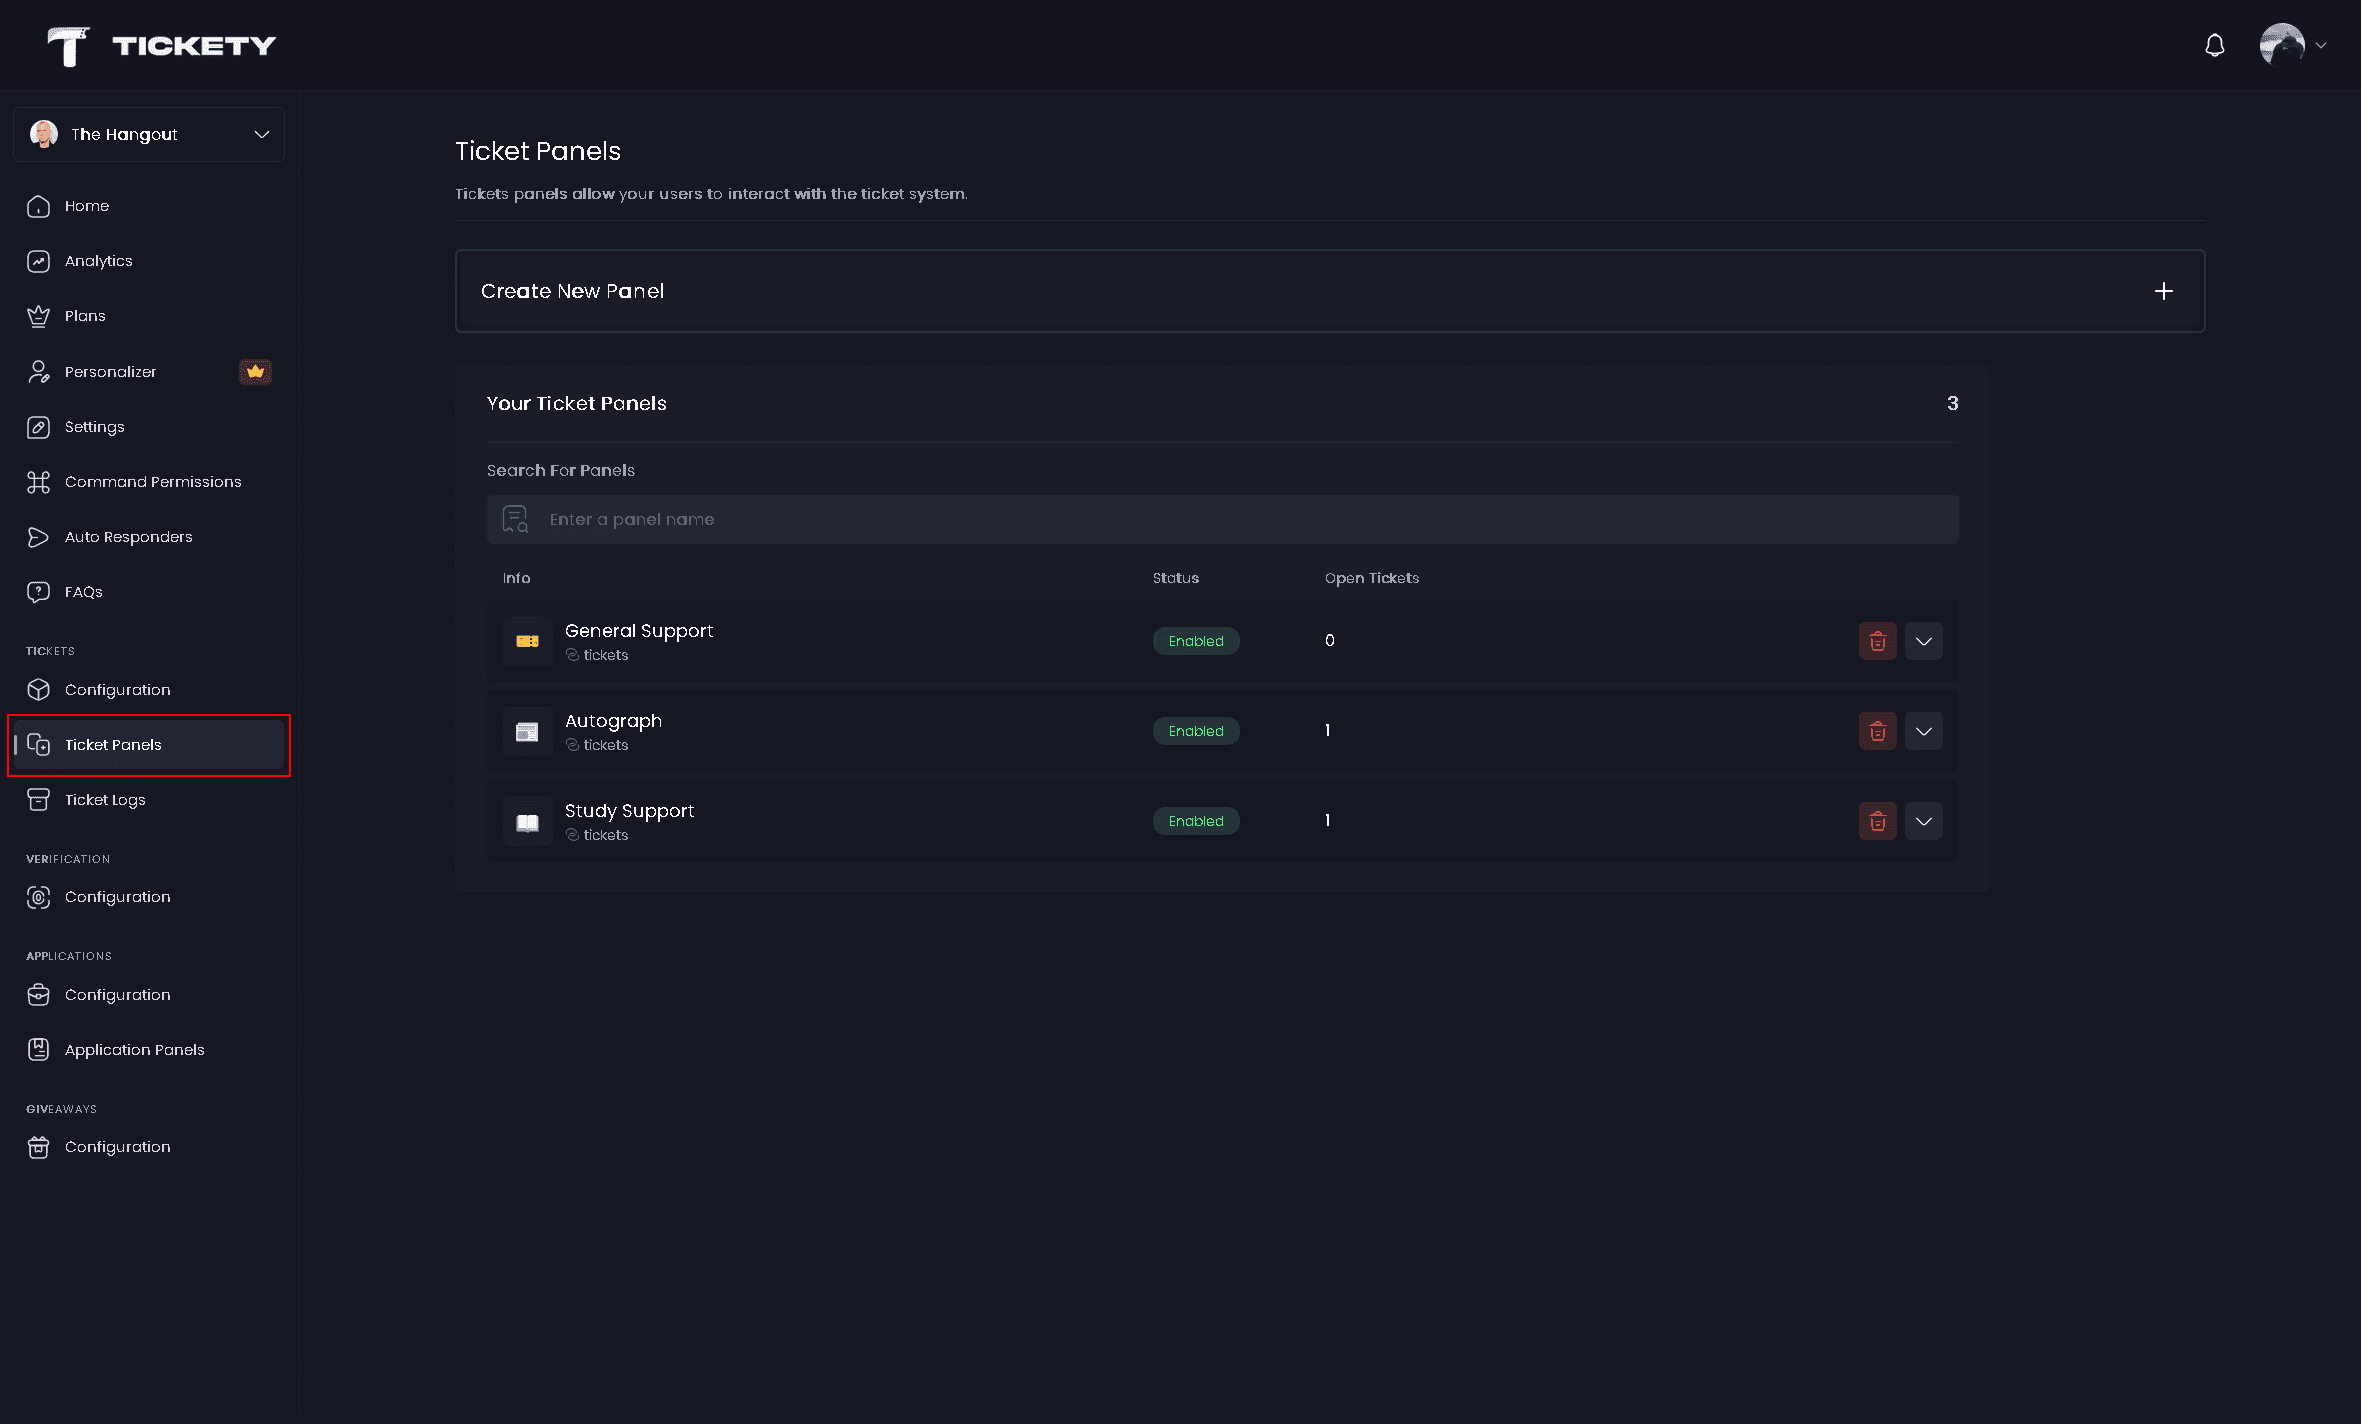
Every panel lives on one page. Open your Dashboard, click Manage on your server, then click Ticket Panels in the sidebar.
- Create New Panel - Starts a new panel. Your first panel opens the Quick Create wizard, later ones open the blank editor.
- Use a Template - Opens a shelf of ready made panels you can start from.
- Search for Panels - Filters the list by name as you type.
The counter beside Your Ticket Panels shows how many panels you have. Free servers stop at 25, and the counter turns red once you reach 25/25.
Each panel card has a menu with three more actions:
- Duplicate - Opens the editor pre-filled with a copy of the panel. The name is left blank so you pick a new one. Channels, categories and support roles are copied too, so check them before you save.
- Save as Template - Saves this panel's messages, form, buttons and settings as a template on your account. Template names hold up to 60 characters and you can keep 10 templates. Roles, channels, categories and linked panels are left out, because they belong to one server.
- Delete - Removes the panel. You are asked to confirm with
Delete Panel. A message you already posted stays in the channel and stops working.
Starting from a template
Use a Template opens the shelf. Five templates ship with Tickety:
| Template | What it is for |
|---|---|
| General Support | A classic help desk for everyday questions and issues |
| Bug Report | Structured bug reports with reproduction steps and frequency |
| Player Report | Confidential rule-breaking reports for your moderation team |
| Partnership | Partnership inquiries with community details up front |
| Billing | Payment and subscription help with safe-sharing reminders |
Anything you saved yourself appears under My Templates in the same shelf, where you can also rename or delete it.
Pick a template, give it a name, a channel, a category and your support roles, and the panel is created with the template's messages, form and settings already filled in. You land in the panel editor, and the message is not posted yet.
Setup Wizard
The setup wizard provides a streamlined way to create a ticket panel with essential settings. You can always modify these settings later in the panel editor. If you would rather skip the wizard and start in the full editor, click Advanced Settings at the bottom of the wizard.
Access the Setup Wizard
-
Go to the Tickety Dashboard
-
Click
Managefor the server you want to configure -
In the sidebar, click
Ticket Panels -
Click
Create New Panelto start the wizard
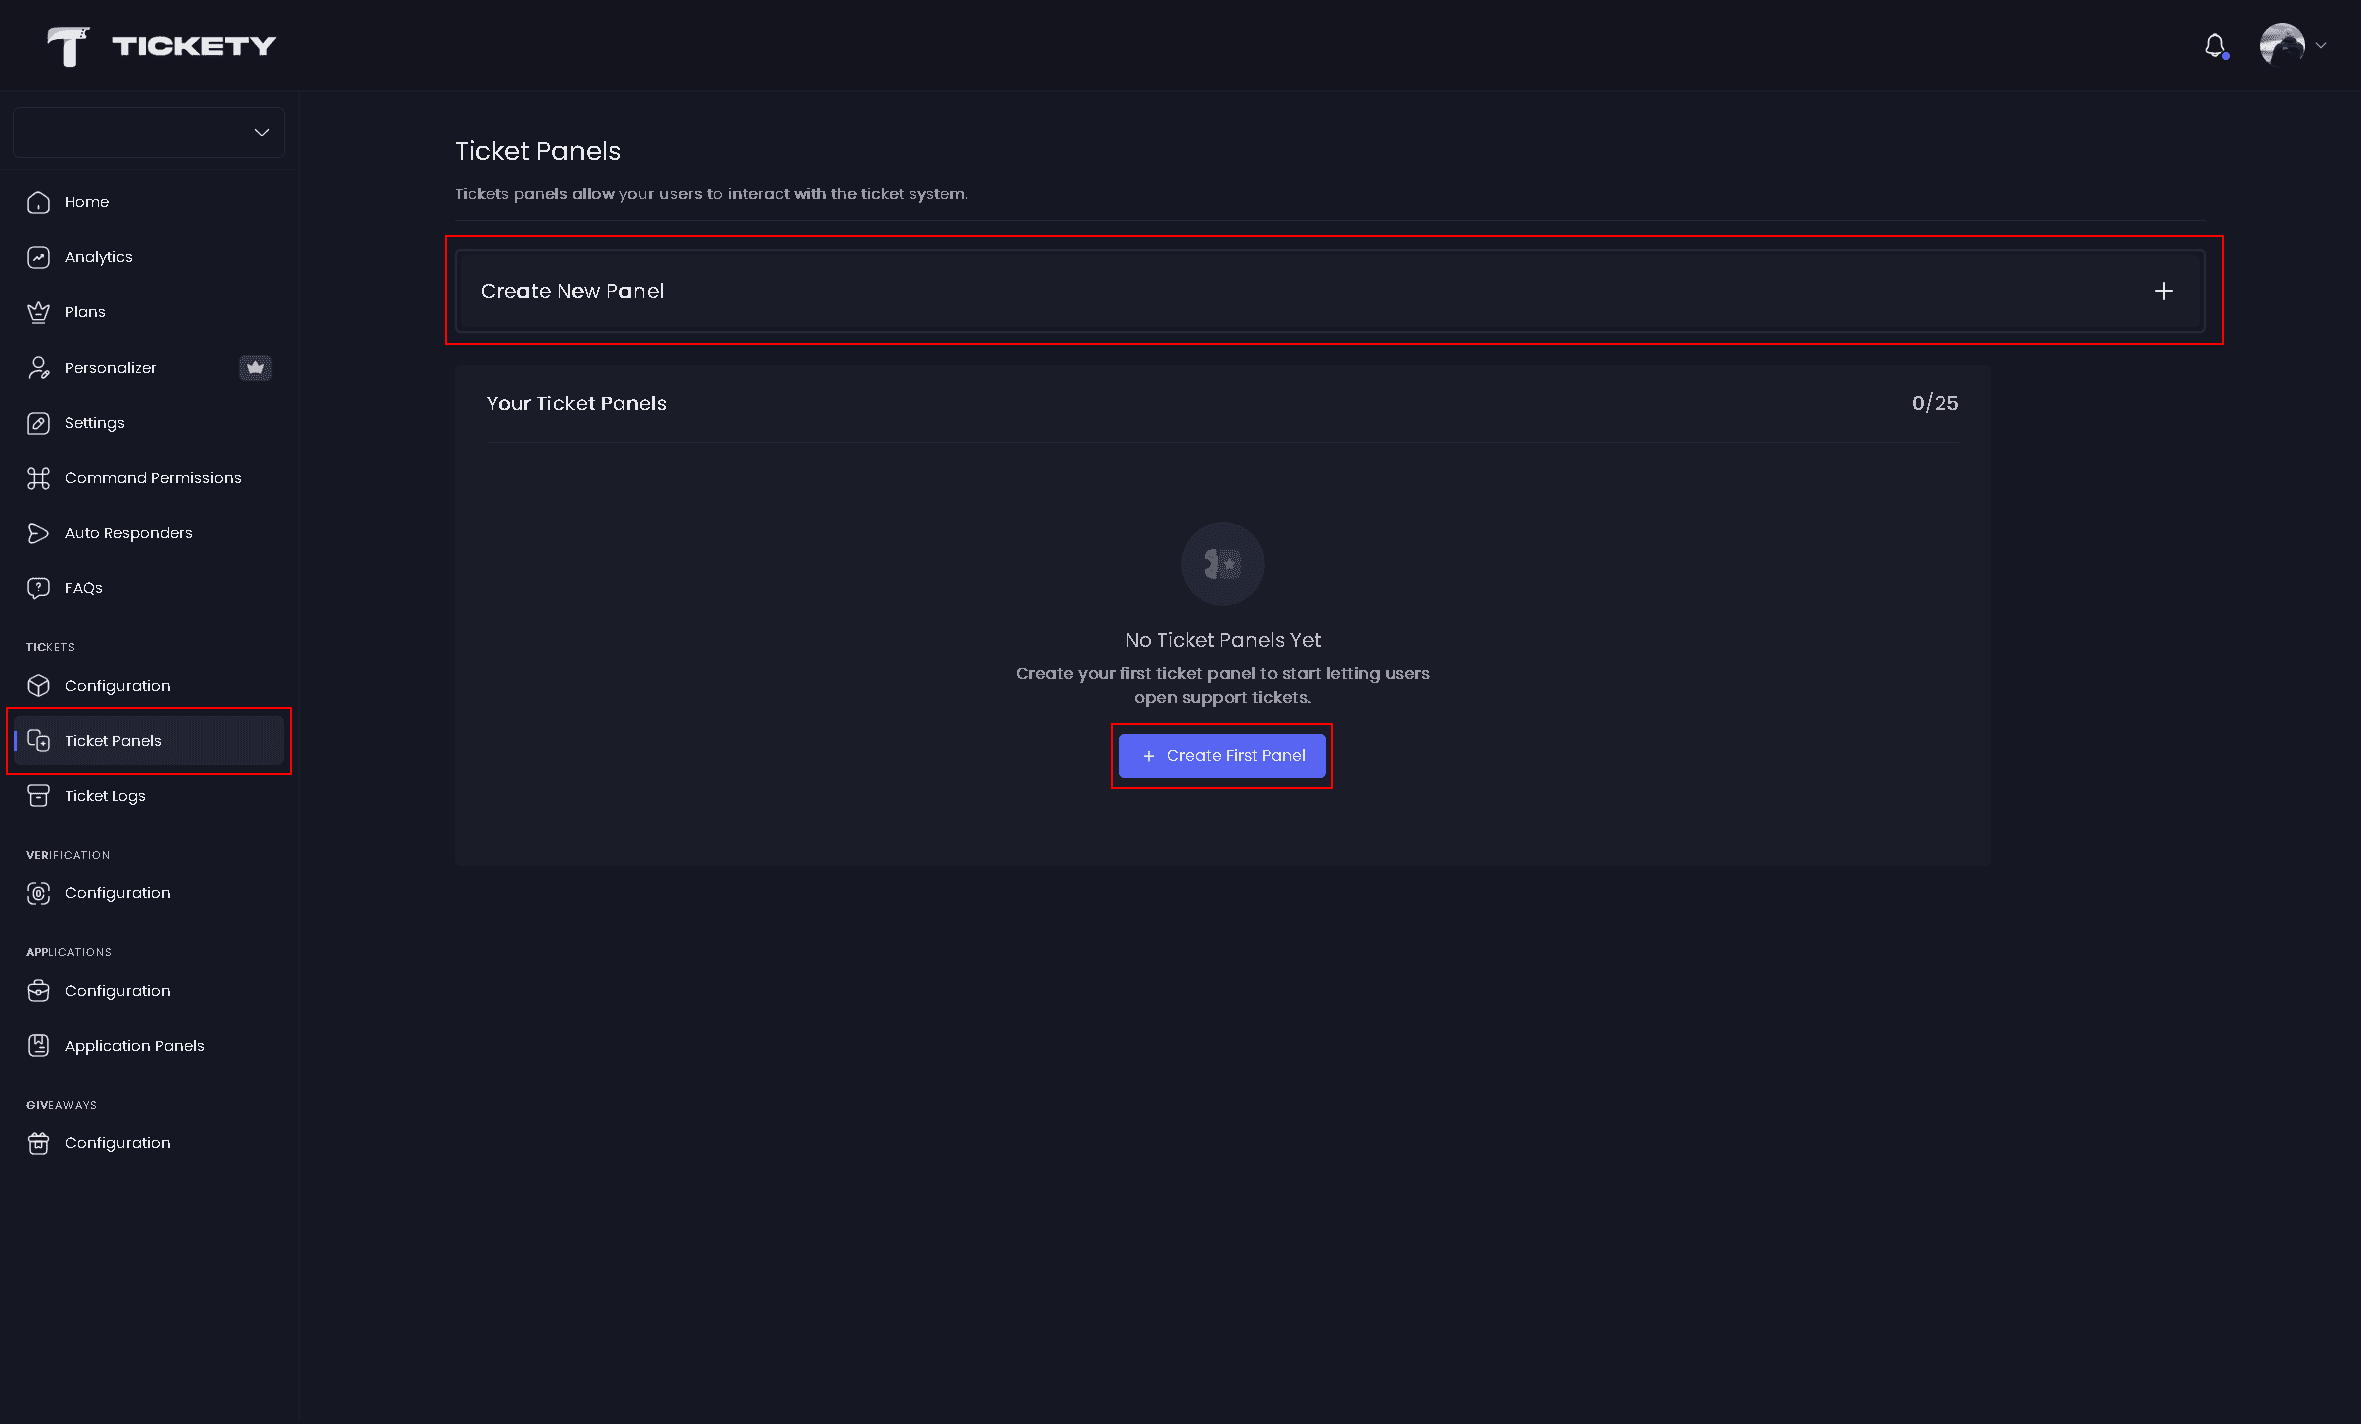
Select Default Ticket Style
Choose how tickets should be created when users interact with this panel:
- Text Channel (Recommended) - Creates a new text channel in your server for each ticket
- Thread - Creates a new thread for each ticket within a designated channel
You can change this setting later in the panel editor.
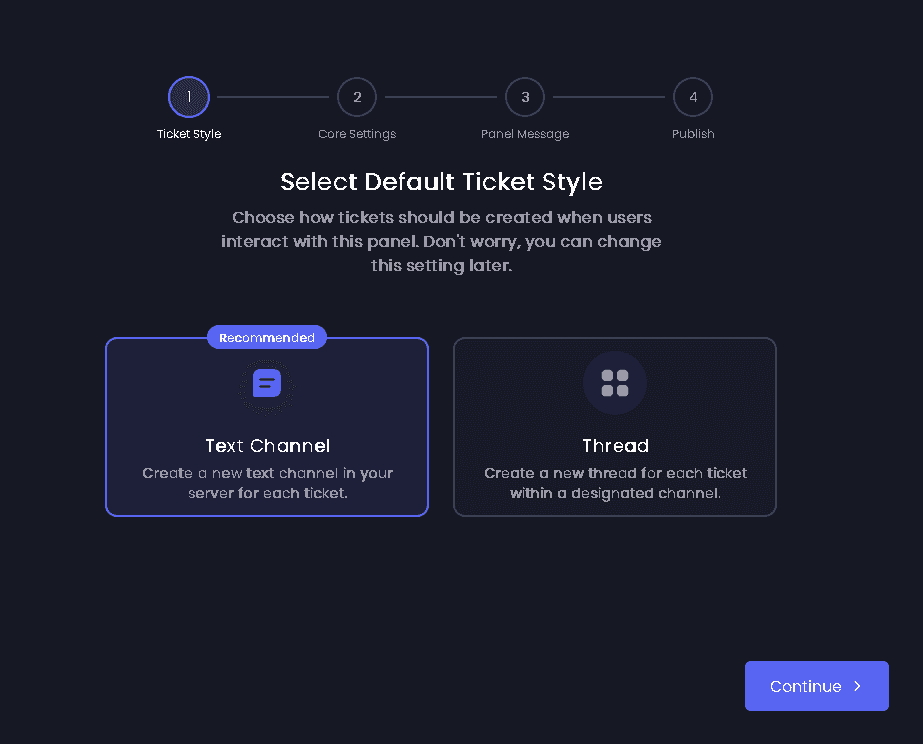
Configure Panel Basics
Set up the essential settings for your ticket panel:
- Panel Name - A name to identify the panel's purpose
- Support Roles - Select roles that can view and manage tickets opened from this panel
- Ticket Category - Choose the Discord category where tickets will be created (this is a category, not a text or voice channel)
If you picked Thread in the previous step, this third field is labelled Thread Channel instead, and you pick the channel the threads are created inside.
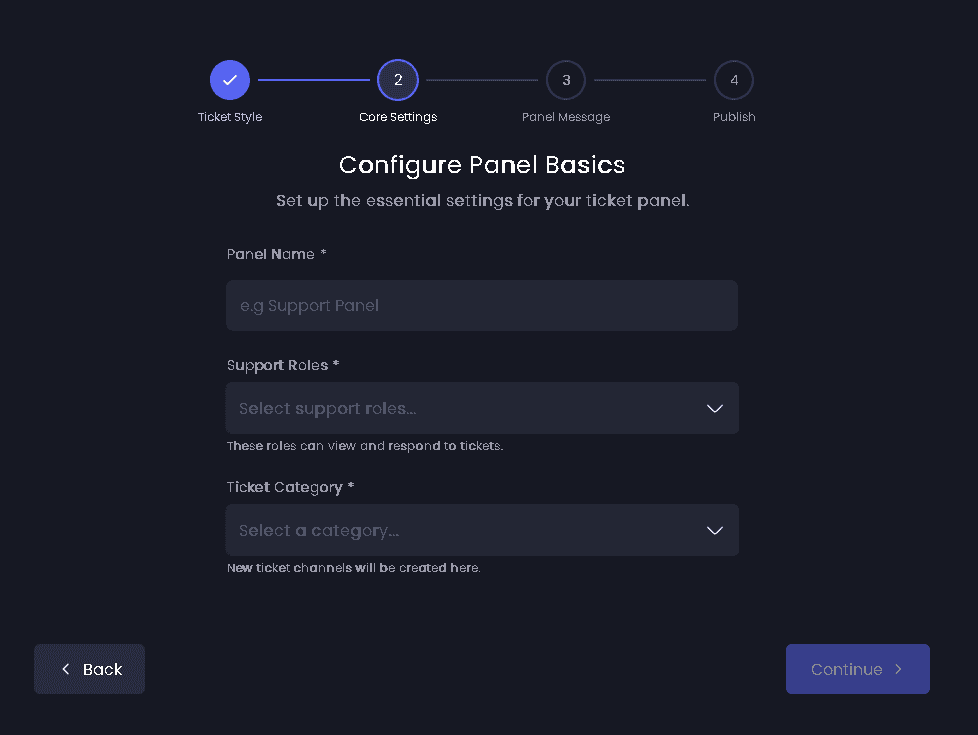
Customize Panel Message
Design the embed message that users will see and configure how they interact with it.
Panel Embed:
You can customize the following aspects of the embed:
- Embed Color - Set the color of the embed's left border
- 👑 Author Icon - Add an icon image next to the author name
- 👑 Author - Set the name of the author
- 👑 Author URL - Add a clickable link to the author's name
- 👑 Thumbnail - Add a small image in the top right corner of the embed
- Embed Title - Set the main title of the embed
- Embed Description - Add the main content/description text
- 👑 Large Image - Add a large image at the bottom of the embed
- 👑 Footer Icon - Add an icon image next to the footer text
- 👑 Embed Footer - Add text at the bottom of the embed
To customize the aspects labeled with a Crown, you need a Premium Subscription.
Button Type: Choose between "Button" or "Dropdown" for user interaction.
Button Configuration: Set the emoji, label, and color for each button or dropdown option.
The preview shows how your panel will appear to users.
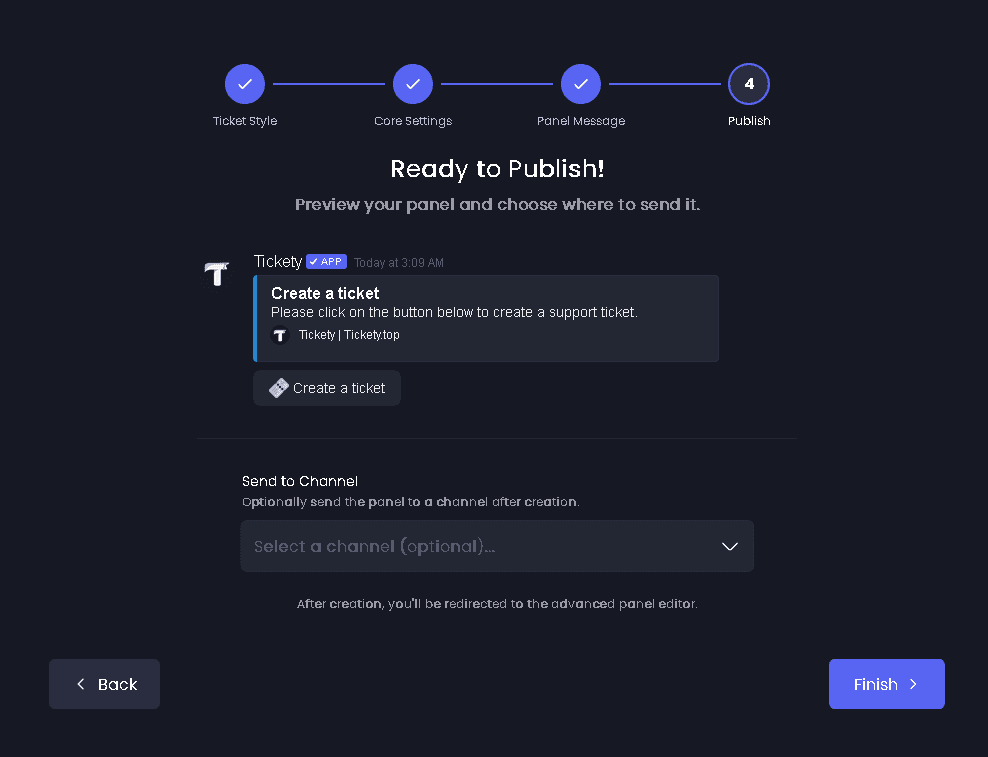
Publish
Preview your panel and choose where to send it:
- Review the panel preview to see how it will appear in Discord
- Optionally pick a channel under Send to Channel
- Click
Create & Sendto create the panel and post the message
If you leave Send to Channel empty the button reads Create Panel instead, and the panel is saved without posting anything.
After creation, you'll be redirected to the advanced panel editor where you can configure additional settings.
Manual Configuration
After creating a panel, you can access the full panel editor by selecting your panel from the Ticket Panels list. The editor provides comprehensive configuration options organized into nine tabs: General, Embed, Messages, Forms, Roles, Availability, Logging, AI and Advanced. A save bar appears at the bottom of the page whenever you change something, and nothing takes effect until you press it.
Access the Panel Editor
If you just completed the setup wizard, you'll be automatically redirected to the panel editor. Otherwise, follow these steps:
-
Go to the Tickety Dashboard
-
Click
Managefor the server you want to configure -
In the sidebar, click
Ticket Panels -
Select the panel you want to edit from the list
General Tab
The General tab holds three sections: Panel Settings, Ticket Settings and Ticket Permissions.
Panel Settings:
-
Panel Enabled - Turns the panel off without deleting it. A message you already posted stays where it is, but clicking it replies with
Panel Disabled. A disabled panel is also hidden from/new,/force ticketand the panel picker on/request ticket. -
Panel Name - The name identifying the panel's purpose, up to 80 characters. It is also the
{panel.name}value used in ticket channel names. -
Support Roles - Roles that can view and manage tickets from this panel, up to 25. Drag them to reorder. A panel with no support roles replies
Panel Support Roles Not Setwhen a member tries to open a ticket.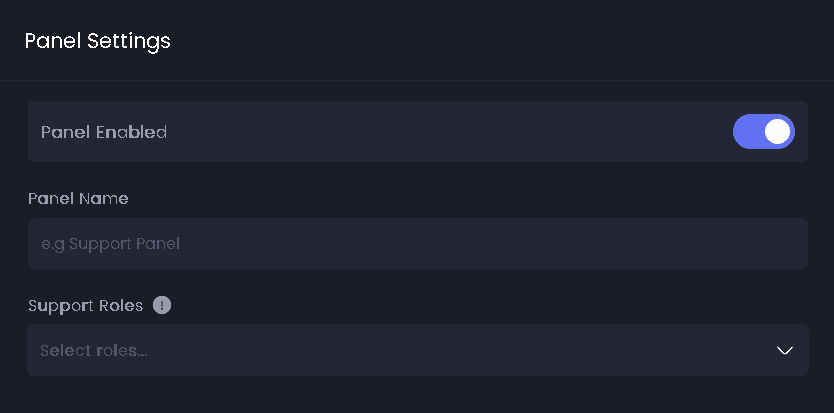
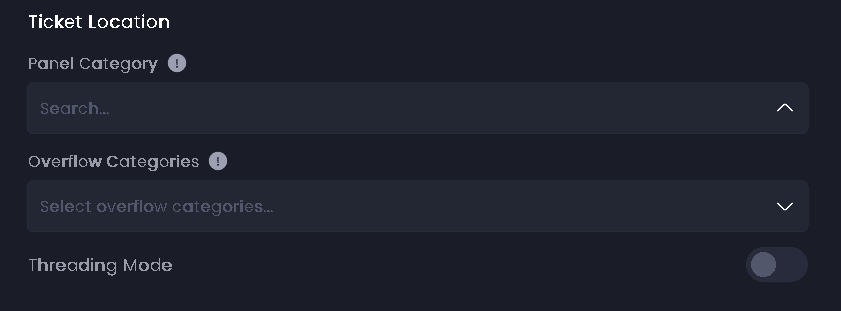
Ticket Location:
-
Panel Category - The Discord category new ticket channels are created in. This is a category, not a text channel.
-
Overflow Categories - Up to 5 backup categories, used in the order you drag them when the main category is full. If they are all full the ticket is still created, but it sits with no category at the top of your server. The warnings for both cases are toggled under General Settings.
-
Threading Mode - Off by default. Turn it on to open each ticket as a thread inside one channel instead of as its own channel.
-
Panel Channel - Replaces Panel Category while Threading Mode is on. This is the channel the threads are created inside, not the channel the panel message is posted in.
-
Archive Threads on Close - Only shown while Threading Mode is on, and on by default. Archives the thread when the ticket closes instead of leaving it open.
Transcript Settings:
-
Save Transcripts - Saves a readable copy of the conversation when the ticket closes. On by default.
-
Save Transcript Images 👑 - Keeps the images posted in the ticket inside the transcript.
-
Private Transcripts - Off by default. Restricts this panel's transcripts instead of letting anyone with the link open them. Server owners, admins and anyone with dashboard ticket access always keep access.
-
Who Can View 👑 - Appears once Private Transcripts is on. Choose which of
Ticket Creator,Added Users,Support RolesandAdmin Rolemay open a private transcript. Without premium all four stay on and cannot be narrowed.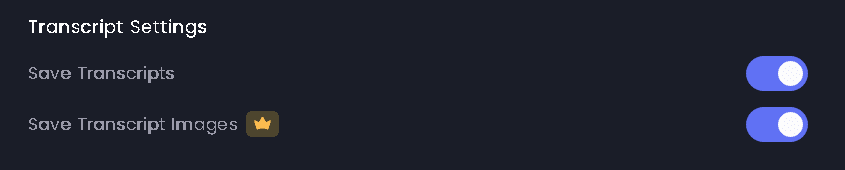
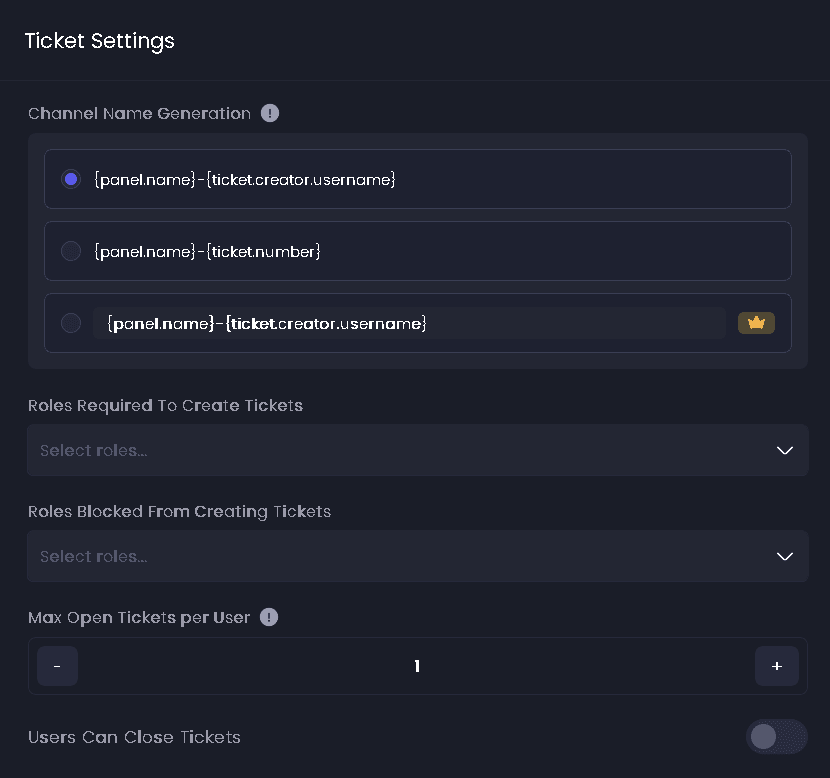
Ticket Settings:
-
Channel Name Generation - Decides how each ticket channel is named. Two presets are free:
{panel.name}-{ticket.creator.username}(the default) and{panel.name}-{ticket.number}. The third option is a Custom format 👑 box holding up to 100 characters. Use the placeholder picker beside the label to see everything you can put in it. -
Roles Required to Create Tickets - Only members with these roles can open a ticket here, up to 25. Leave it empty for no restriction. Once you pick two or more roles a small Members must have control appears under the picker, set to
Anyby default. Switch it toAllif a member needs every one of them. -
Roles Blocked from Creating Tickets - Members with any of these roles cannot open a ticket here, up to 25. Blocked wins over required.
-
Ticket Limit Bypass Roles - Members with these roles ignore this panel's per-user limit, and the server wide per-user limit when opening here. Up to 25 roles.
-
Max Open Tickets per User - How many tickets one member may have open on this panel at once. Defaults to
1, accepts0to100, and0means unlimited. A member over the limit seesTicket Limit Reachedwith their current count. -
Max Open Tickets per Server - Caps the total number of open tickets this panel may have across the whole server. Defaults to
0, which means unlimited. Discord allows up to 500 in channel mode and 1000 in thread mode. Turning Threading Mode off pulls a value above 500 back down. -
Ticket Creation Cooldown 👑 - How long a member must wait between tickets on this panel. Defaults to
0, which means no wait. Free servers can set up to 1 hour, premium up to 7 days. If premium lapses the value you saved is kept, but only an hour of it is applied. -
Users Can Close Tickets - Off by default. Lets the ticket creator and anyone added to the ticket close it themselves. Your staff can always close, whatever this is set to.
Claiming:
-
Claiming System - On by default. With it off, the Claim button is not sent and
/ticket claimis refused. -
Ticket Visibility - Decides what the rest of your support team can do once a ticket is claimed. Pick one of
Support Team keeps full access to the ticket,Only the claimer has access to the ticket(the default) orSupport Team can view the ticket but not write in it.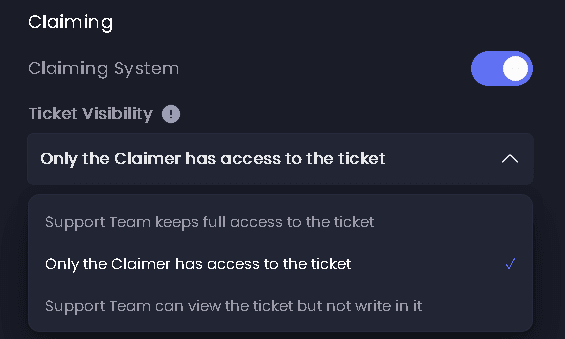
Ticket Footer:
- Text 👑 - The footer on the bot's replies inside tickets from this panel, up to 2000 characters. Free servers keep
Tickety | Tickety.top. - Icon 👑 - A small image beside the footer text. Accepts png, jpg, jpeg, webp and gif.
Close Requests 👑:
- Auto-close - Decides what happens when nobody answers a close request.
Staff choose(the default) prompts for a time on every request and lets staff clear it to skip auto-closing.Fixed timeauto-closes every request after the time you set.Neverleaves the ticket open until someone closes it. - Prefilled Time or Close After - In
Staff choosemode this is the value the prompt opens with. InFixed timemode it is the delay every request uses. Set in days, hours and minutes. The field is hidden inNevermode, and anything longer than 7 days is treated as 7 days.
Ticket Permissions:
Press Configure Ticket Permissions to open a drawer where you choose the extra Discord permissions each group gets inside ticket channels from this panel. There are three groups:
- Ticket Participants - The ticket creator and anyone added with
/ticket add, a transfer or a move. - Support Roles - The roles set as support roles on this panel.
- Admin Role - Your server's ticket admin role.
Each group has the same ten toggles, and every one of them starts on: Send Messages, Read Message History, Embed Links, Attach Files, Add Reactions, Use External Emojis, Use External Stickers, Use Application Commands, Send Text-to-Speech Messages and Send Voice Messages.
The drawer keeps your changes until you press Save & Close, and you still have to save the panel afterwards.
Changes here never touch tickets that are already open. They apply the next time a ticket's permissions are set, which is when a ticket is created, claimed, transferred, moved, or when someone is added to it. Turning off Send Messages or Read Message History means that group cannot take part in the ticket at all, and the dashboard keeps a warning on screen while either is off.
Embed Tab
Customize the panel message appearance and interaction method.
Linked Panels: Link multiple panels together in one panel message. See the Linked Panels guide for detailed instructions. One panel message carries up to 20 linked entries and at most 25 clickable options in total. Linking other ticket panels is free. Linking an application panel or your verification button is premium, and without it that entry is simply left off the message.

Panel Message:
Choose how the message is built. Embeds is the default: coloured panels with a title, description and fields. Components 👑 lets you place text, images and buttons in any order you like. Switching between the two is not destructive, so the version you are not using stays saved.
Free servers can use 2 embeds per message with 1 field each. Premium raises that to 5 embeds with 25 fields. Discord caps the combined text across all embeds on one message at 6000 characters.
Customize the embed that users see when the panel is published.
You can customize the following aspects of the embed:
- Embed Color - Set the color of the embed's left border
- 👑 Author Icon - Add an icon image next to the author name
- 👑 Author - Set the name of the author
- 👑 Author URL - Add a clickable link to the author's name
- 👑 Thumbnail - Add a small image in the top right corner of the embed
- Embed Title - Set the main title of the embed
- Embed Description - Add the main content/description text
- 👑 Large Image - Add a large image at the bottom of the embed
- 👑 Footer Icon - Add an icon image next to the footer text
- 👑 Embed Footer - Add text at the bottom of the embed
To customize the aspects labeled with a Crown, you need a Premium Subscription.
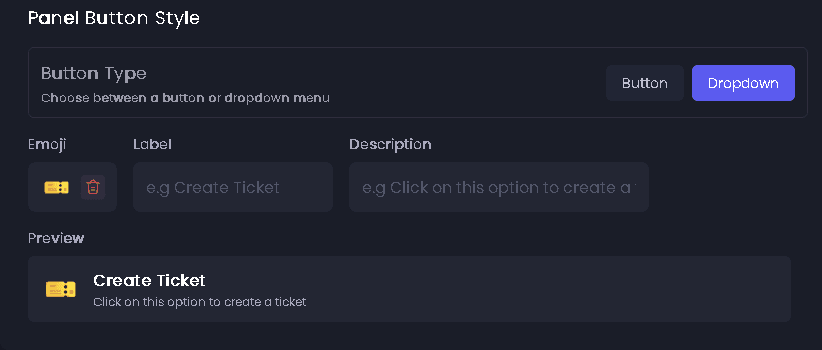
Panel Button Style: Configure how users interact with your panel.
- Bot Reply Color - The colour used for the bot's replies and logs in tickets from this panel. It only appears in Components mode. In Embeds mode this is simply the colour of the first embed.
- Button Type - Choose between "Button" or "Dropdown" for user interaction. It only appears in Embeds mode, because in Components mode the block layout decides the shape. See the Button/Dropdown Toggle guide for more information. The dropdown's placeholder text is set server wide under General Settings and is premium, so free servers see
Select a category. - Emoji, Label, Description and Color - The look of the button or dropdown option members click to open a ticket. It starts as a grey 🎫 button labelled
Create a ticket. Labels hold 80 characters and dropdown descriptions 100. Colours are blurple, grey, green and red. Custom server emojis are premium, and without it a custom emoji falls back to 🎫.
The preview shows how your configured buttons will appear to users.
FAQ Configuration: Link a FAQ panel to your ticket panel so members can search your answers before opening a ticket.
-
FAQ Panel - The FAQ panel the button opens. Leave it empty for no FAQ button.
-
Sync Embed Color 👑 - Makes the FAQ answers use this panel's embed colour instead of the FAQ panel's own.
-
Emoji, Label and Color - The look of the FAQ button. It starts as a grey ❓ button labelled
FAQ. The colour is premium, so free servers always get the grey button.
Messages Tab
Configure messages sent in tickets.
Welcome Message: Customize the first message sent when a ticket is opened. Configure the author, embed title, embed description, and footer. It uses the same Embeds and Components 👑 choice as the panel message.
Under the editor is the mentions picker, which decides who gets pinged when the ticket opens. Ticket Creator, Support Roles and Admin Role are on by default. In channel mode you can also add individual server roles, @everyone and @here, and drag them into the order you want. Thread mode offers the three built in options only. See the Welcome Message Pings guide for detailed instructions on customizing pings.
Auto Pin Welcome Message: Toggle to automatically pin the welcome message to the top of the ticket channel. On by default.
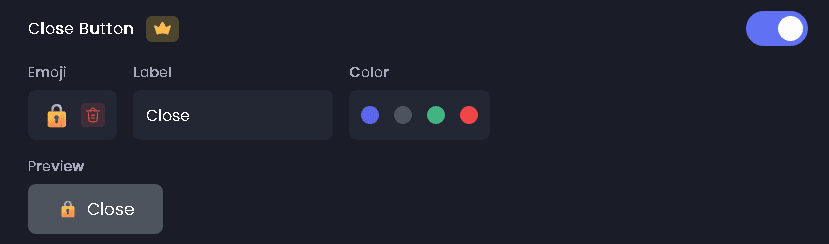
Close Button:
Shows a Close button under the welcome message. It is on by default and free, and members see a grey button with the 🔒 emoji labelled Close. Changing the emoji, label or colour is premium 👑.
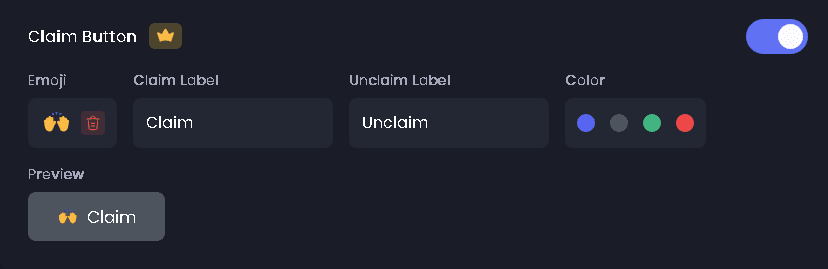
Claim Button:
Shows a Claim button under the welcome message, and it is only sent while Claiming System is on. It is on by default and free, and members see a grey button with the 🙌 emoji labelled Claim. Changing the emoji, the Claim Label, the Unclaim Label or the colour is premium 👑.
Request Close Button 👑:
Adds a button your staff can press to ask the ticket creator to confirm a close. It is off by default, and it starts as a grey ⏳ button labelled Request Close. Unlike the other two it has no free version: without premium the button is simply not sent. See Request Close Command for what happens next.
Buttons are sent in the order Close, Request Close, Claim.
Forms Tab
Configure custom forms that users must fill out when creating tickets.
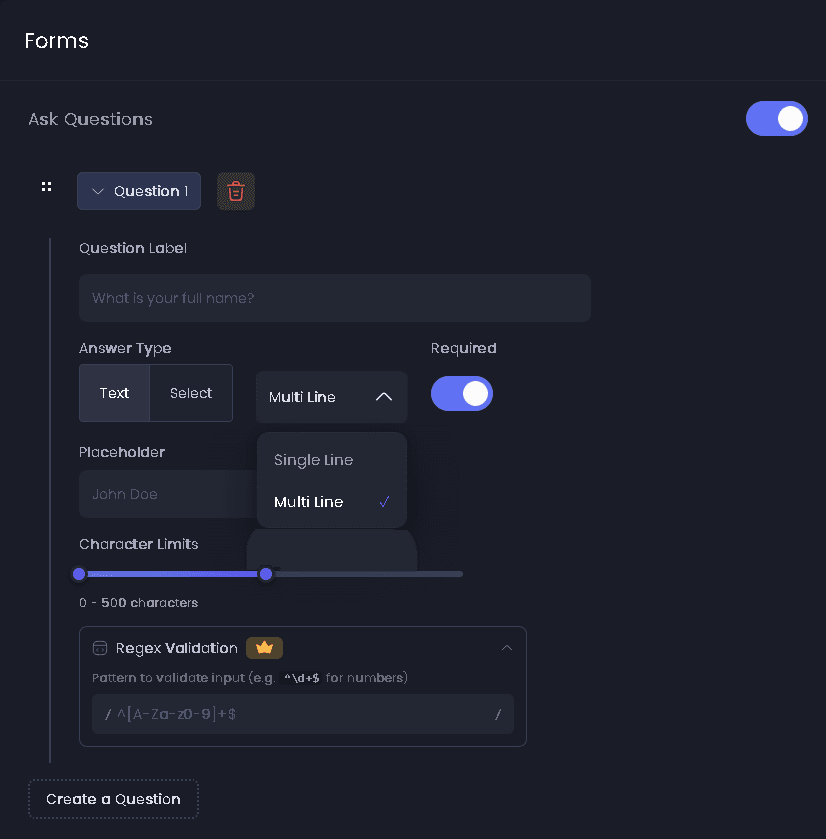
Ask Questions: Turn this on to show the member a pop-up form before the ticket is created. Their answers are posted in the ticket.
Press Create a Question to add one. The counter on the button reads x/3 on free servers and x/5 on premium, and you can drag the questions into the order you want. If a panel stores more questions than your plan allows, only the first ones are actually asked.
Every question has these four fields:
- Question Label - What you are asking, up to 45 characters.
- Description - Optional extra guidance under the label, up to 100 characters.
- Answer Type -
Text,SelectorImage Upload👑, each with its own styles below. - Required - Whether the member has to answer before the form can be submitted.
Text splits into Single Line and Multi Line (the default), and adds:
- Placeholder - Grey hint text inside the answer box, up to 100 characters.
- Character Limits - The shortest and longest answer you accept,
0to500by default and up to 1024. - Regex Validation 👑 - Rejects answers that do not match a pattern you supply, for example
^\d+$for numbers only. Up to 500 characters.
Select splits into Option Select, Checkbox, Role Select, Channel Select and User Select, and adds:
- Options - The choices a member picks from, on
Option SelectandCheckboxonly. Type an option and press Enter to add it, and drag to reorder. Option Select holds 25 options, Checkbox holds 10. - Min Selections and Max Selections - How many choices a member must and may pick, both
1by default. Set Min Selections to0to make the question optional. Checkbox allows up to 10 selections, and Role, Channel and User Select allow up to 25.
Image Upload 👑 asks the member for an image instead of text.
The three features on the AI tab all read the member's written answer, so the form has to be on with at least one text question before any of them will run.
Roles Tab
Give or take a role from the ticket creator automatically.
Press Create an Action and fill in three things: the role, the event and what to do.
- Role - The role to hand out or take away. Roles above Tickety's own highest role cannot be picked, because Discord will not let the bot touch them.
- Event -
On Createruns when the ticket opens,On Closeruns when it closes. - Action -
AddorRemove.
A common pair is Add on create and Remove on close, which gives the member a role that marks them as having an open ticket.
Free servers get one add and one remove per event. Premium 👑 lifts that cap so you can assign more than one role per action.
Availability Tab
Configure when your support team is available and what happens outside support hours.
Support Hours: Set up your team's availability schedule. Toggle to enable support hours, select your timezone, choose between "Basic" or "Advanced 👑" scheduling (Advanced is Premium), and configure availability for each day of the week. Basic weekly scheduling works on free servers, and it starts at Monday to Friday, 09:00 to 17:00, with the weekend off.
While creating a panel you may also see Use Last Support Hours, which copies the schedule from the panel you set up most recently.
Closed State Logic: Configure what happens when users try to create tickets outside support hours. Allow with Warning lets users create tickets but see a warning about delayed responses, and it is the default. Deny Creation 👑 blocks ticket creation until support hours resume (Premium feature).
Message Configuration: Customize messages shown based on support status. Configure messages for Reduced Support, Emergency Only, and Closed states. Toggle to disable staff pings in status messages. Support Hours Bypass Roles 👑 allows specific roles to create tickets outside support hours (Premium feature).
Logging Tab
Configure logging for ticket events.
- Log Channel - The private staff channel where this panel's ticket logs and transcripts are posted. Each panel has its own, and it follows your server's general log channel until you pick one here.
- Send Logs in Ticket Channel - Toggle to send log messages directly in the ticket channel. On by default.
If your server has no general log channel and you leave the panel on the default, nothing is logged, and the page tells you so. If you pick the same channel the panel message is posted in, the page warns you and asks you to confirm before sending, because every member would then be able to read your ticket logs.

AI Tab
Three helpers that run before the ticket is created. They spend AI credits rather than needing premium, and all three need Ask Questions on with at least one text question. Until that is true the tab shows a red banner with a Set Up Default Issue Form or Add Default Issue Question button that sets it up for you.
- FAQ Deflection - Checks the member's form answers against an FAQ panel and offers the closest answer before the ticket opens. The member can accept it or press
Create Anyway, so they are never blocked. Pick the FAQ Panel here as well, otherwise the panel refuses to save. - Automatic Ticket Priority - Sets the new ticket's priority from what the member wrote. It leaves the priority unset when the form does not say enough, and your staff can still change it.
- Wrong Panel Suggestion - If the member's issue looks like a better fit for another panel, they are shown
Better Panel AvailablewithUse Suggested PanelandStay on Current Panelbefore the ticket opens. Fill in Current Panel Description, one short line saying what this panel is for, then add each panel you are happy to redirect to under Suggested Panels and describe it. At least one suggested panel is required, otherwise the panel refuses to save. Descriptions you write here are saved onto those panels too.
A suggestion that sits unanswered expires, and the member is asked to submit the form again. If your server has no credits left, the ticket is simply created as normal. See AI Ticket Features for the rest of what AI can do with tickets.
Advanced Tab
Additional advanced configuration options.
-
Sync Category Permissions on Move - Off by default. When a ticket is moved to another category, the ticket channel takes on that category's permissions.

Sending the Panel
Pick a channel in the Channel to post panel in dropdown at the top of the editor, then press Send the Panel. That channel is where your members see the panel, and it is not the log channel.
While you are creating a panel the same button reads Publish, and a second button called Create saves the panel without posting anything.
Every press of Send the Panel posts a brand new message. Editing the panel afterwards does not change a message you already sent, so delete the old message and send the panel again. You also cannot send while you have unsaved changes: the save bar shakes instead.
Members can reach a panel without the posted message as well. Add it under Panels on the Selector on the New Ticket Command page and they can open it with /new. Your staff can post a panel from inside Discord with /sendticketpanel.
Limits
| Free | Premium | |
|---|---|---|
| Ticket panels per server | 25 | unlimited |
| Form questions per panel | 3 | 5 |
| Support roles per panel | 25 | 25 |
| Overflow categories per panel | 5 | 5 |
| Linked entries on one message | 20 | 20 |
| Clickable options on one message | 25 | 25 |
| Embeds per message | 2 | 5 |
| Fields per embed | 1 | 25 |
| Components layout | no | yes |
| Custom channel name format | no | 100 characters |
| Ticket creation cooldown | up to 1 hour | up to 7 days |
| Ticket footer text | no | 2000 characters |
| Regex validation on a question | no | 500 characters |
| Image Upload questions | no | yes |
| Roles added or removed per event | 1 add, 1 remove | unlimited |
| Saved panel templates | 10 per account | 10 per account |
Features marked with a crown (👑) require a Premium Subscription.
Where to go next
Some ticket system settings are configured globally and apply to all panels:
- General Settings: server wide ticket limits, the dropdown placeholder and overflow warnings.
- Close Ticket Settings: close messages, close reasons and the confirmation step.
- New Ticket Command: the panels members see on
/newand the message above them. - Autoclose Settings: closing tickets that go quiet on their own.
- Request Close Command: asking a member to confirm a close.
- AI Ticket Features: what the AI tab does, and the AI helpers that work outside panels.
- Available Commands: every slash command, including
/newand/sendticketpanel.