
Setting up your Custom Bot
Run Tickety in your server under your own bot application, with your own name, avatar, status and activity.
Prerequisites
This feature requires a Premium Subscription.
Before you begin, make sure you meet the following requirements:
- A Tickety Premium 👑 subscription
- The Custom Bot 👑 add-on on that subscription
- Permission to invite and add bots to your Discord server
Both are bought on Premium & AI in the dashboard. See What is Tickety Premium? if you do not have them yet.
Create an application
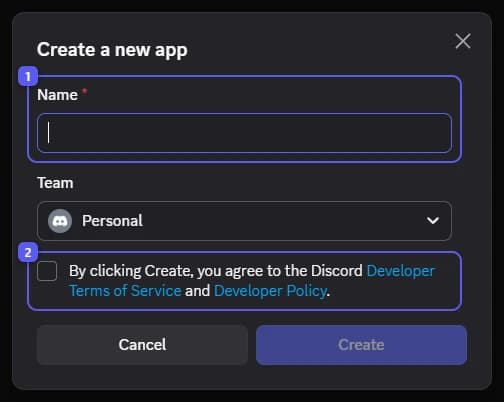
Open the Discord Developer Portal and press New Application at the top right of the Applications page.

Name it
- Type a name under Name. You can change it later.
- Tick the box to agree to the Discord Developer Terms of Service and Developer Policy.
Then press Create.
Customize your bot
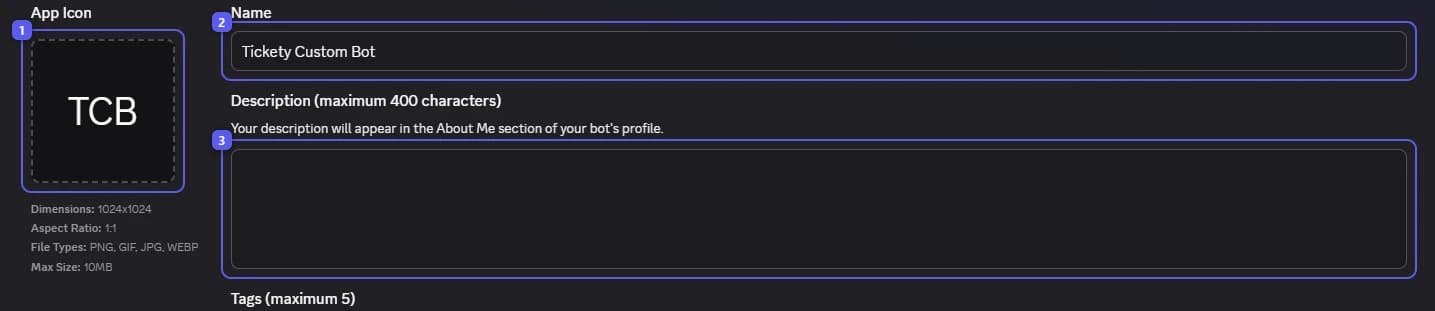
You land on General Information for your new app.
- App Icon becomes your bot's avatar in Discord.
- Name is the app's name.
- Description shows in the About Me section of your bot's profile.
Save your changes in the bar that appears at the bottom of the page.
Set up the bot user
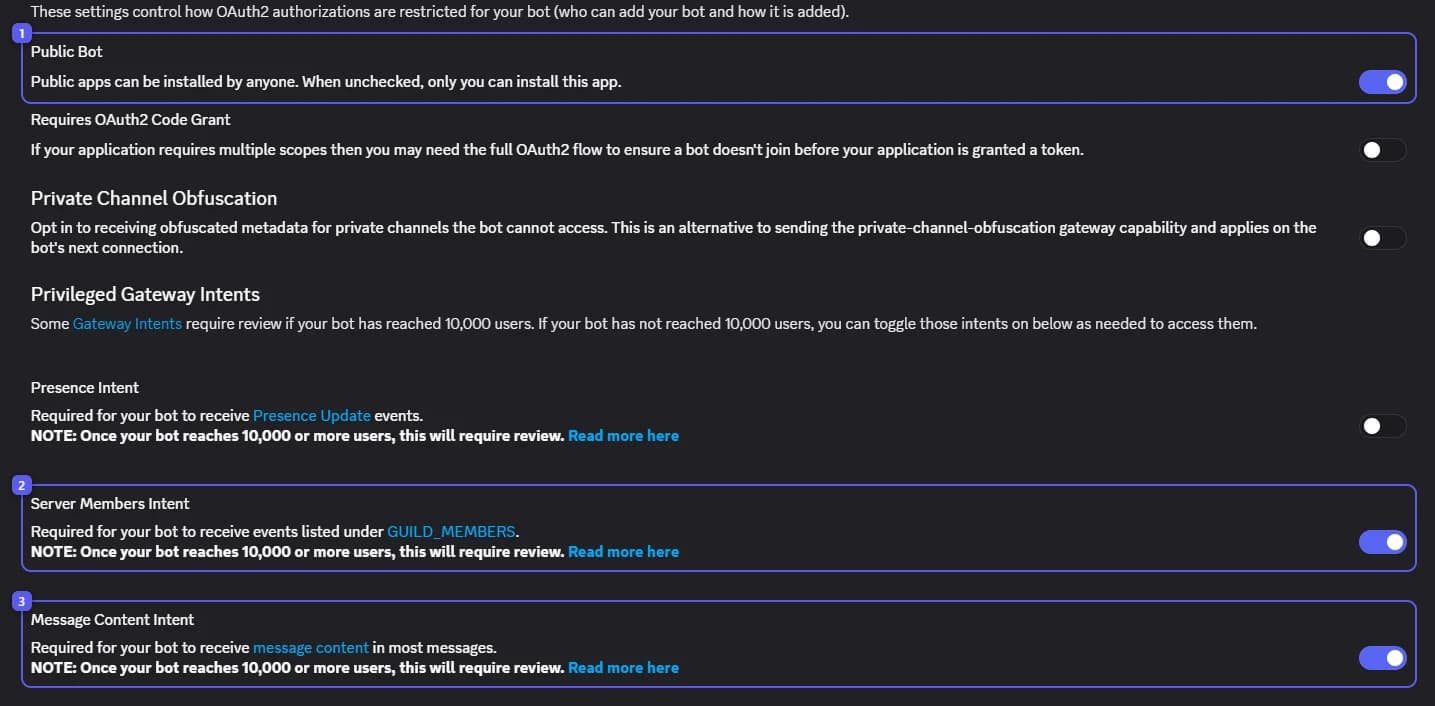
Open Bot in the sidebar.
- Public Bot: on
- Server Members Intent: on
- Message Content Intent: on
Tickety needs both intents and switches them on for you when you save your token. If saving fails with Missing required intents, Discord did not accept the change: turn both on here by hand, then save again in the dashboard. Presence Intent is not needed.
Copy the token
Still on Bot, press Reset Token, confirm, and copy the token Discord shows. It is only shown once.

Add it to Tickety
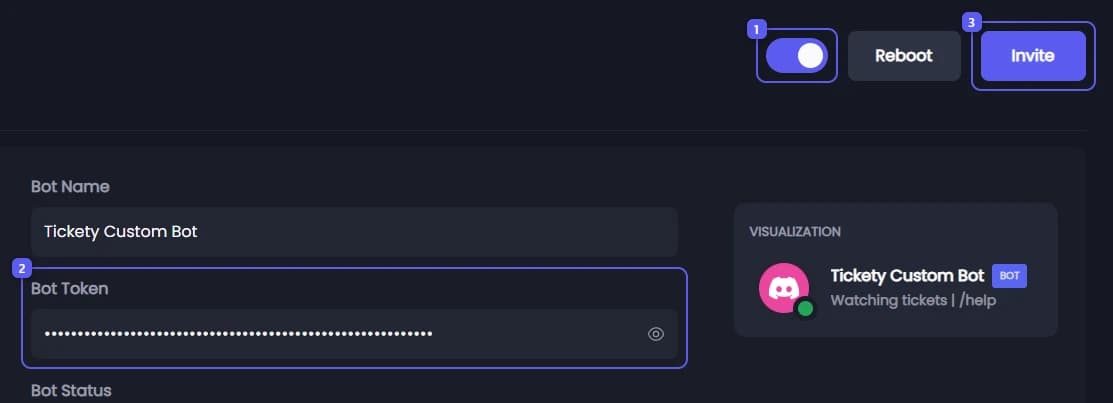
Open your Tickety Dashboard, pick your server and click Personalizer in the sidebar.
- Switch Bot Personalizer on.
- Paste the token into Bot Token, then press Save Changes in the bar at the bottom.
- Press Invite and add your bot to your server. The button appears once the token is saved.
Check it is online
Your bot shows up online in your server's member list. Read After your bot is online before you remove the Tickety labelled bot.
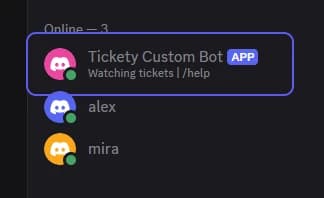
Congratulations on setting up your Custom Bot!
Personalizer settings 👑
Everything your bot shows in Discord is set on this one page.
- Bot Personalizer: The toggle in the page header. On, with a valid token saved, your bot comes online and runs Tickety for this server. Off, your bot is stopped and the regular Tickety bot takes over again. It starts off.
- Reboot: Restarts your bot. It only appears while the toggle is on. Use it if your bot has gone quiet.
- Invite: Opens Discord's authorization page with your bot preselected for this server and the permissions Tickety needs already ticked. It only appears once a token has been saved and Discord confirmed the application.
- Bot Avatar: Your bot's profile picture, sent straight to Discord when you save. Press Upload Image to pick a file. The accepted formats are PNG, JPG, GIF and WEBP, up to 8 MB.
- Bot Name: The username your bot shows in Discord. Keep it to 32 characters or fewer: the box lets you type more, but the save is rejected. Markdown and mentions are stripped.
- Bot Token: The token from your Discord application. It is hidden by default, with an eye button to reveal it while you paste. Once saved it comes back masked, so copy it somewhere safe if you need it again.
- Bot Status: The coloured dot next to your bot in the member list:
Online,IdleorDND. It starts onOnline. - Bot Activity: The verb Discord puts in front of your text:
Playing,Listening,Watching,CompetingorCustom.Customshows your text on its own with no verb. It starts onPlaying. - Activity Text: The text after the verb, up to 128 characters. Markdown and mentions are stripped, and there are no placeholders here: the text appears exactly as you type it.
- Visualization: A live preview of the avatar, name, BOT tag, status dot and activity line. It is preview only, and it is hidden on narrow screens.
Saving a new token restarts your bot. Changing only the status or the activity updates the running bot without a restart.
Discord rate limits name and avatar changes. Saving a second change straight after the first can fail with Failed to update bot profile on Discord. Wait a moment and save again.
This feature requires a Premium Subscription.
After your bot is online
- Run a command such as
/newto confirm your bot answers. Until it does, keep the Tickety labelled bot in the server. - Once your bot answers, remove the Tickety labelled bot. Only one of them should be handling your tickets.
- Set your Command Permissions on the Tickety dashboard. Discord's own Integrations screen cannot manage permissions for a custom bot, so the dashboard is where they are saved and your bot enforces them directly. If you already set permissions in Discord, the page offers to import them.
- Everything else in your configuration is unchanged. Panels, forms, logs and transcripts carry on exactly as before, now sent under your bot's name.
When your custom bot stops
Your bot goes offline and the Tickety labelled bot takes over again in three cases:
- Premium ended on this server.
- The Custom Bot add-on was removed from the subscription.
- The Bot Personalizer toggle was switched off and saved.
Your token, name, avatar, status and activity are all kept. Turning the toggle back on with premium and the add-on active brings your bot back with the same settings.
Troubleshooting
Where to go next
- What is Tickety Premium?: the plan and the add-on your bot needs.
- Managing your subscription: adding or removing the Custom Bot add-on later.
- Command Permissions: who can run which command, which is where custom bots differ.
- Custom Bot Intents Application: the answers Discord asks for once your bot passes 10,000 users.